BIZZFLIES: TRICKS badge

Monday, 29 June 2015

HOW TO CHANGE PASSWORDS INTO TEXTS


I guess a decade has passed away since my last post,Just kidding..So I would like to ask for pardon.And I even want to bring something to your notice,As I'm not able to post frequently.Guest-posting is wide open now,Anybody interested has apply for it and I'll accept your request.

Coming to the post,In this article perhaps a simple tutorial in which you're going to learn how to change any password into normal text i.e bulletins to texts.

Well this can't be exactly determined as a hack,but it does partially.This method can be best used for pranking out with your friends.This trick can also be used for checking whether you've entered the right password or not.

So let's get started.
Note that if the web page is reloaded the text again gets converted into passcode(password).

1.First go to any website where you want to change the pass into text.For demonstrating let me take Facebook.

2.After that enter your log-in information that is your mail id and pass


3.Now Right-click on the password area followed by "inspect element".


4.When you click on inspect element you notice many sub-option in it Such as "element" "network" Sources" etc... Nothing much to worry bout it,Because here we're not going to change the whole set of codes.

5.Under "elements" You can many codes over there.
What you've gotta do here is change
"<input type="password" ,to "<input type="text"

And here we go the password will be successfully changed into text,This method can be performed in any websites,using the same technique.
Check out the images below to get a clear cut.


Here you can notice that I've changed password into text,As Soon as you do this You get something Like this:


LAST WORDS

So this is how we change passwords into texts using this simple trick,Hope so you enjoyed reading this,Do share this article with your friends.If you're facing any problems in doing this so,Put down your problems in comments and I'll help you to get done with it.Again I want to notify you'all that guest-posting is open if you wish to contribute to this blog it would be great for me as well as you.
Read More

Wednesday, 13 May 2015

COMMENTS:ALL YOU NEED TO KNOW ABOUT IT


A Post without any comments is same as a house without no people living in it,I basically mean that Comments are a must in a post,because that's the perfect way to interact and express one's views by arguing or supporting a particular statement.Comments add spice to the post and keeps the post engaged.

WHAT EXACTLY IS A COMMENT?

As mentioned above comment is expressing one's view through text,images by arguing or supporting the topic,it also turns out the post crispy and keeps the post crowded,But wait?Does the same thing applies for bloggers,like me and you? Though comments mean the same at every point of view,this is applicable but we need to follow it in a different way.Getting comments is ain't a easy task perhaps we need to work hard to get good views from your readers,And Many Blogger's are still struggling for comments,to be frank Even I do suffer a bit,Many of the articles written on this blog lags comments,But now I've found out some of the best ways to get assured comments from fellow Blogger's as well as others.

BEST-PRACTICES TO GET 100's OF COMMENTS

1.Share Your articles on your fan page(s)

Sharing your newly published posts on your social media fan pages like Facebook can help you bring comments because they've liked your page on their will and hence they do comment on their will,This method doesn't works if you have less number of fans,but I can assure you that you even get comments from low number of fans if they're real,unique and have liked your page by their own wish.

2.Ask For it

Another great way to get this done so is by asking,Never ever hesitate to do this,most of them are going to comment only if you ask them,I didn't mean to beg but to ask kindly for example at the end of the post you can make it something like this 
"So what's your view on this post,do let me know your views through comments"
                                                   Or
"Did I miss something?If so then list it down in the comments,I would thank you a lot for it."

Giving the post a twisty end like this can surely grow you comments,Here you do have a major problem if you don't have nice amount of traffic to your blog,You get no comments by asking if you don't have good amount of traffic,To get Loyal traffic and make the readers comment you need to make the content unique.

3.One post a week is more than enough

You might have heard many of them saying that posting regularly boosts your traffic,What I say is that's partially true,By making this you have chances only to get on to top of Google but not win the hearts of your readers,Make a habit of posting articles once in a week that excites your readers to come into it and make out their views.

4.Keep it simple 

Suppose a person loved you post and wants to thank you,but he couldn't!Why is that so?The only reason behind this could be of your bad commenting system you've enabled on your blog.So by having a neat aligned comment box your chances of getting comments are high.I recommend you to use Intense debate or CommentLuv On your blog to get more comments.
And I've seen that many people comment on your blog just to get a do-follow backlink from your blog,and By using intense debate or CommentLuv you get comments from these types of people,but approve only it if looks good,Never bare spam comments.

5.Comment on other's blog

Comment to get commented.Yes this really works! Comment on blogs of your friends or known one's to get them comment on your blog,By doing this i'm 101% Sure that you'll get back comments from them.It turns out to be a barter system,and it's a simple and easy way to get comments.

Bonus Point: 

Recently Myself and my friend have started a new comment exchange Group In Facebook called "Comment Hub" You can too join there for getting comments by commenting by other's blog. If you want to join the group then Go here -----> Comment Hub
This is a new group and want more members to join,So send a request and I'll surely accept it.! :)

FINAL WORDS

Here comes the end of the post,if you find it useful do share it with your friends If you have any queries bout his then let me know,Finally what do you think about this post?Tell me your views through commenting.
Have a nice day ahead.

Read More

Friday, 13 February 2015

HOW TO MAKE OFFICIAL IMAGES FOR YOUR BLOG


Though Images aren't a major source for ranking yet it matters a lot,It can take over your Readers and impress them,This makes them getting back to your site again and again.
Creating a official image Gives a loyalty as well as it  makes a sense of copyrighted image.


WHAT ARE OFFICIAL IMAGES??

official images are your signature images,you didn't get what I meant right?In simple words to say these are images with your logo embedded In the image,For instance:

"In association with: xyz , Exclusively on :xyz " (xyz represents your blog's logo,title etc...)

Making such types of images Also Gives you a promotion or even publicity when someone shares it. ;)

Using such types of images has great advantages such as:
1.Seems to be like a copyrighted image
2.No one can Steal and put it on their blog if they do so You are promoted (Cool right?!)
3.By creating own images you won't be penalized by search engines
4.Images are large sized

HOW TO MAKE SUCH TYPES OF IMAGES?

Stepping down to this you've two ways of making images:
1.Alter other images;
2.Completely  make your own image

Going through the second way is the best but it consumes much of your time,but it even doesn't mean that you can't make it! What I do and recommend is to make your own images for small post and alter images for long post,by this you can spare same time on both type of posts!!
Now Let's get started

Generally when we think of creating images or edit images,Photo-Shop is the first that gets flashed in our mind,But now the problem is "If we ain't good at photo-shop" then?? friends there's nothing need to worry here,We are going to use an online tool which is actually used for creating info-graphics but let's use it for images !!

=> Head on to this Link.
This is a famous website for creating images,info-graphics,cards headers and much more...
What all you need to do is just create an account there which hardly takes upto 5 mins

=>As soon as you get started with the account,Click on "Facebook post".Generally a blog post image will be in the resolution (940*788)px 
At the sidebar you can see multi-options such as ,Search,Layout,Background,text etc....

Here you can select anything i.e layout or background for the base,I prefer background rather than layout.
Click on background and select your color.Now continue like as you wish adding texts,style.

HOW TO MERGE BLOG LOGO WITH THE IMAGE?

Now here Comes the catch,as previously we discussed that keeping logo with image had many benefits,now the question is how do I  merge the logo??


Open a new-tab upload your logo (uploads>Upload your own images) and change the background of the logo to the background colour of the image,when you do this and merge your image it'll be like just a piece of logo is uploaded.
Now after you change the background of logo save it to your disk and go back to the image,There upload the logo whose background we changed now! 
In Canva there's a option called drag and drop,Perform that action and drop the logo into the image,
Now the problem is that the logo seems too big to fit in the image,For this resize the image and place it in a corner but remember that it should be noticeable.
See the example below.

This Is what I had previously did for one of my sponsored post,To promote I've made this type of image that we discussed still now.

HOW TO ALTER IMAGES WITH LOGO:

This is a subsidiary version of the above trick.here you just need to download an image from google,Change it's background in canva or if you wish you can even do it in Photo Shop:

Now follow the same steps as mentioned above.

FEW LAST WORDS:

So I hope You've learnt a new and unique way to make blog post images which are absolutely the best,You can use this for other stuffs too like making a facebook post,twitter images etc....
Comments are well appreciated,Do comment your views bout it!. Happy valentine's day! :)


Read More

Monday, 13 October 2014

HOW TO INCREASE YOUR SOCIAL MEDIA ENGAGEMENT/TRAFFIC

traffic,social media

Social media networks are also one of the important source for blogger's from where they can drive traffic to their blog,And we can benefit ourselves well enough.
Some of the common ways for traffic from social media is status and people's interest in it!
We get good number of clicks to our blog only when people are interested in that particular topic.


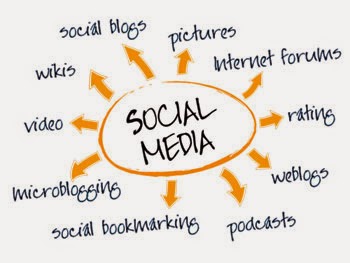
From the above picture we can find something really useful,we can find that a social media consists of the following interests,So having any of the following topic could expose your work spot! :)

TIPS FOR INCREASING SOCIAL MEDIA ENGAGEMENT

Facebook: 

i) Getting traffic from Facebook is not a hard work but You've to understand the plan and execute it perfectly,One of the best way is to increase the engagement is by a Facebook fan page with good number of likes,around 1000+ is satisfied.But getting 1000+ people under your topic of interest is not a easy work but can only be possible through creating an ad,Rather than this Let's try to increase the engagement rate through a smart idea.
It's believed and even true that most of the people would love to have a fun time on social sites rather than gaining information,and it's even true that they share what they feel funny or Nice,But if your page is not based on fun stuffs then??Ah! This is not a big deal but I've found a simple solution to get thorough this! 
Basically on the start-up of your page put some meme's before inviting your friends.After then keep an alternates of post with a fun thing and a interesting info or a fact,This keeps people engaged all the time and you even-get good amount of click-through's with even a less number of likes.
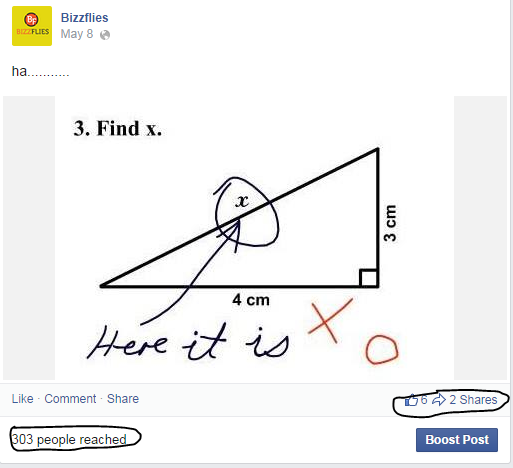
Have a Look a the below picture.


At the start-up of my page I was a newbie and didn't knew any strategies,So I used to only put these type of things,Surprisingly people where interested in the above photo which has a potential reach of 303 with 2 shares which is really huge for having only 260(average) likes for the total page.By this I can recommend you to engage people with some or the other things with at-least a single update on your page a day!

ii) The second factor is groups,posting in groups also brings out good number of visits and increase your engagement,Nothing more to tell about this But be sure to follow the rules of the groups before you promote your link or URL for the post! 

Twitter:

Twitter is more powerful than Facebook on the basis of traffic and engagement,Here your status matters more than use of pictures and videos,Tweet funny things,crack few jokes meanwhile don't forget to post your website URL,Following this gets you massive number of followers which also results in increase of engagement as well as traffic.One of the best way to gain followers by following them,it's common that when you follow them most of the people follow you back,I think you understand the importance of following others,By doing this I recently got nearby  170 followers within a day which is really useful for our traffic!

Google+

I personally believe that having more circles with more followers gives you out good clicks,and google+  is one of the best way for driving traffic suppose anyone has signed in to their Google account and search for your keyword it's sure that your profile is showed up in the first page which redirects to your blog or post,So always be smart at keyword jobs to choose the right one's.

RSS,Pinterest and other networks:

Rss traffic is not a main source of traffic but it should be taken seriously,For Rss traffic subscribers matters a lot,Let me tell you a simple thing to increase your subscribers as one of my friend said me that your subscribers can be increased by giving out something important what they need for free that's similar to a give-away,He even suggested me that nowadays if you give any eBook you won't get nice amount of subscribers as today's internet trend is not interested in it,So it's better to give some good premium tools for free as what he does and he's even getting lot's of subscribers.
And these above listed networks can help you to get good amount of clicks and engagement.
Moving to other networks I usually don't use them nor get traffic from them but even they're strong enough,it's better to have a profile on almost every network and so to promote the link/URL's etc...


FEW LAST WORDS

Perhaps these are the tricks which I Use and exercise,do pen-down your tactics and views about this article.I hope you Enjoyed this article.
Read More

Thursday, 2 October 2014

STRATEGIES FOR DESIGNING A TOP-CLASS LOGO

Designing a Logo

Having Logos are essential for a company or a blog as it shows-off your brand widely to your customers or readers!!It naturally describes about your blog or company,which can also be called a mini art,Creating a Logo
doesn't takes much of time only when you're interested and Ready to work hard.Let's consider some basic tips and steps that Helps to create a branded logo.

PRACTICAL STEPS TO DESIGN A BRANDED LOGO

1.Think about what type the logo should be of:

This is quite related to blog niche or company's task meanwhile a logo should be created that is connected towards your blog or company,Having a blog or company based on technology or software and keeping a logo as an animal or toys doesn't makes any sense,So there should be a huge connectivity between your product based on and your logo.

2.Relate your logo with name and description:

When a person gets a first look on your brand mainly focuses on logo and this is what makes him/her impressed ("First impression is the best impression")So what actually Attracts them???the major reason would be giving out a short info about the brand in a perfect manner and this includes the style and creativity!

3.Figure out Several sketches:

So when you've got a perfect idea on what type your logo must be based on,Start sketching out several figures,Figures should have difference amongst them but they should result to same described function.

4.Maintain the perfect colour-combination

By now you've figured out the logos but you should be a bit creative while choosing the colour scheme,don't mess it up let the logo not be too dark nor light have a equal combination of both and turn it to ideal bright!If you're planning to put up any fonts in the logo then make sure to have a simple font-style which is bold enough,and I think turning your font to italic style would be a bad idea because it spoils the Style.

5.Have your own creativity rather than copying:

We usually think that copying a similar style of a popular brand would make us popular.But this is absolutely wrong,think of your own styles and trends  implement your ideas and test it,it is natural to face failures but if you do't stop it you're surely gonna get the success,Have the right shape which includes a triangle,circle,square etc.......And don't use complicated shapes.

6.Keep it Simple! :


Simplicity is always the best don't over decorate or try unwanted stuffs around it indeed keep it simple.

7.Ask For Suggestions:

This is one of the best way to find your right-logo,pick out any 2-3 logos you've liked the most and ask to suggest their favourite and at the end of all the suggestion choose the ones which has the highest number of votes this even let's you to pick the right logo easily and also people become happy as of taking their decisions.

8.A piece of revise before the publish:

There may be few or several minor mistakes or unwanted things lying on your logo which is gone unnoticeable by most of us!So it's  a smart work to revise the logo again and again before the exposure!!

And these tips would surely help you out to create an amazing logos!.

TOP TOOLS RECOMMENDED FOR CREATING LOGOS

Knowing the procedure without the tool doesn't brings out anything,Now Let's have a look on few tools which are good-enough to create Logos!

ADOBE PHOTOSHOP:Popularly known for photo-editing works but This is one of the best tool ever for creating Logos,Here you can stretch and bend your mind for creating the logo as you wish,but according to me I think you need to have a bit of experience in Photoshop to create Logos and images!!

ON-LINE TOOLS
If you feel it is not possible for you to create a logo in Photoshop then try out the on-line tools where you need to pick the one's you liked or describe how you want to!
Some of the top on-line logo making websites are as follows:

3.Swiftly (Recommended)

The above mentioned websites provides you with cool logos but the problem is that many of them use it,So there won't be a Standard quality logo separately but I would like to recommend swiftly for you as what you need to do is just describe what type of logo you want and the professional designers out there will give you awesome results,in case if you're not satisfied you can go on requesting the revision with what changes else need to be done!And they'll get it for you.

FEW LAST WORDS

This ends up the article giving you the top-strategies used to make a branded logo for your blog or company! Feel free to comment your views and if you feel something is missed out, let me know That I would be happy to hear from you!!


Read More

Monday, 8 September 2014

HOW TO SEND FRIEND REQUESTS IN FACEBOOK VIA EMAIL


SEND FRIEND REQUESTS VIA EMAIL

It has been a long time since my last post however Here's another article,and this is something different from rest of the things Have you ever knew that you can send friend requests to anyone just by knowing their email address,Probably everyone would think this a dumb work and most of us would like to go up with send friend requests in a common manner but believe me this is one of the best ways,the key reasons are:

1.Send/Add Huge number of friend requests at a time without getting blocked.
2.What you just need to know is their email.
3.This trick even works out well when you're blocked. 

This doesn't sounds helpful on small number but this is definitely gonna help you out on discussing about large numbers. 

Completing this task consumes a bit time as this is your experience of sending friend request through mail.


FRIEND REQUEST VIA EMAIL?


So how is that possible?Actually here your primary work is importing contacts from your PC to Facebook at certain forms which gets stored in Facebook's servers which then tends to send request to the particular person if the email is valid On Facebook,and this is the task what it performs and you've got no breath-taking tasks! :)

COMMON THING YOU NEED TO KNOW BEFORE THE IMPORT


The greatest disadvantage you face is that you can't upload or import your contacts at any format,there are only several formats such as (.vcf) , (.csv) , (.txt) etc.....which is applicable for this step as i've tried all these and found (.csv) works perfect with no issues on it,Adn i would even like to Prefer you the same.


HOW TO IMPORT (.CSV) CONTACT FILE ON FACEBOOK

And this is the most important wok to perform for adding huge number of friends,
Let's get started

1.Login to your Facebook Account
2.And head on to invite page! 
Find friends>Under Add personal contacts(manage imported contacts)>Invite friends
                                                OR
Directly go to the invite page by This Link:https://www.facebook.com/invite.php

3.Now you would feel a bit confused as there are two options of the same i.e Invite friends by email as in the below picture.

HOW TO SEND FRIEND REQUESTS IN FACEBOOK VIA EMAIL

 4.Now you've to click on "import your email addresses" which is found below "Invite Friends you Email" followed by other tools.

5.And Now it's the time to Upload our (.csv) as a contact file.

6.After this when you click on upload the valid accounts will be shown up,I want to show an example that this works and only valid accounts are shown!

What I did is, in the contact file I entered my email id and uploaded it on my Facebook fake profile and as the .csv file had no problems it was automatically uploaded any valid account was displayed,basically this means that the email which are on Facebook only those accounts are applicable.

After this step just click on 'Add Friends' and the requests will be automatically sent giving you a notification as "Success A Friend request will now be sent to your friend.Once he or she accepts your request ,you will be able to see each other's Profile"People who wants to be friend with you accept your request henceforth the people who aren't interested of course reject. 

FINAL WORDS


This ends up the tutorial here and By now you must have been succeeded in completing this work and  found it working,if you're not confident with this try the way as I did,that is make a fake profile and send request from the fake profile to your original account!And I'm sure that this is gonna  work out for you,One more thing I want to remind you-Friend requests will only be sent for valid email address on Facebook!If you're confused somewhere I will be glad to help you out and comments are appreciated,Stay Tuned for more :)


Read More

Tuesday, 12 August 2014

LET YOUR READERS LIKE AND SHARE YOUR POSTS INSTANTLY

LET READERS SHARE AND LIKE YOUR POSTS

Posts are the one and only element which brings out readers for your blog and you need then a lot!Readers to your blog are just like guests arriving at your house!So for now let us consider Your blog as your house and readers are your guest, Usually you give a nice hospitality to your guest and this is what you even need to do for your readers

WHAT DOES IT ACTUALLY MEAN?

Giving hospitality to your readers in sense tells that provide all those they need,now coming to the point that what do readers mainly need?We can sort out few listings based on this
a.For the first and foremost solve your readers problem
b.Explain each and everything properly
c.Be unique
d.Share your posts and let others share it for you!

If your readers felt your post is something really useful they would naturally tend to like and share your pots on their fb wall,twitter and much more,and we really feel guilty when we miss out these simple things to have on our blog.
And these are the main factors,and today's article is based on adding some really cool "social-media" likes and shares button!Yeah i know that i was up to something else till now but was all a part of intro.

FIRST LIKES THEN SHARE!

It's better we firstly go up installing like buttons then continue with shares.
We do get many manual codes for these widgets,but we've gotta complete lots of work making the widget run properly,and this can be known as waste of time,there's an awesome website which provides social-like buttons for free with cool customization's...Get it right now by following these simple instructions!
1.First of-all go to the website that provides social-media like buttons right from here  .
2.Now click on Install Flare>Launch>Add a website>blog URL>Add now
3.Just after completing the above steps click on "Get my code snippet" Now you get a set of codes copy that and paste right above '</head>' tag,then click on test connection now you'll be verified and granted for the next!
4.Now just what you need to do is create a new flare edit to your wish and then save the settings.
5.You can now start drag-and drop at the location where you need the widget to be displayed.
The last one that is after you select the location of the widget just click on save settings followed by publish.
And here you go it's done you've successfully added the buttons now move on to the shares.

AND NOW THE SHARE BUTTONS

Indeed to be frank there's a availability of share buttons even in filament but according to me i would choose another stuff for you the main reasons behind this are:
You don't need to do much things to get that
Looks better and smarter ;)
User-friendly

Head on......
1.Now visit sharethis.com and this the place where you get social-media share buttons.
2.Here the most important thing which i liked was the straight-forwardness,your work gets completed within 3 easy steps.
3.Click on Get this code>choose your platform>Select your style>customize.
4.As soon as your customization is completed hit on get this code,now you would be asked to sign-up and there are many alternatives to pass this step,so choose the easiest one to get your account created as i used twitter to create my account which was done within few minutes,and this makes your work much easier.
5.A minor problem which i was not able to notice was that after creating my account when i clicked on get this code there was no response! The reason was my browser was enabled with pop-up blocker,even you may notice that .
6.When you get the code copy it then go to:
Blogger dashboard>Layout>Add a gadget>HTML/JavaScript>Then paste the code in the place of content>Save,If you wish to change the place of it then make sure to click on Save arrangement! :P
And this makes It done!

Now i wanna ask you a question did you feel it hard?According to me absolutely no,hope even you felt the same.

FINAL WORDS

Last but not the least i would like to conclude you to add  the ones i've mentioned above as these are the best picks from my side,Hope you enjoyed reading this articles in case if you get any problems then do pen down your comments and i would be glad to help you out!
Stay tuned for much more.


Read More

Friday, 1 August 2014

EDIT BACKGROUND OF A PHOTO USING PHOTOSHOP


Adobe Photoshop has been an incredible tool ever for photo editing stuffs and there may be vast editing's created with this straightforward software few days ago i wanted to alter the background of a image that's of my last post that is "How to index your new post on Google" the particular image's background was of white and once spending a couple of time in Photoshop finally found an easy trick to edit the background color,there are huge blessings with this simple trick..So do not miss out head on reading this text.
Note:This editing is predicated on Photoshop 7.0 however the likelihood is that it's going to even work on different versions.

1.Open any image file by File>Open>Select your respective image>open.
Now Click on Magic wand tool or by Pressing "W" .
After opening magic wand tool you have gotta click on the image and shortly after it you'll be able to see a dotted line on the boundaries of every object on the pic.


So Your image ought to look something like this one,here what really happens is once you click on image with magic wand it engulfs each object in order that background editing becomes much easier.

2.Now at the right-side you'll be able to notice 3 choices like "Color" "Swatches" "Style" and underneath color sub-options as R,G,B you need not worry concerning R,G have to ought to look after "B"
For "B" you need to line the colour as you prefer.

3.Now navigate back to the photo before than make certain you've got set the colour for 'B' as this is gonna be our background color soon.

4.Now holding ctrl+Left-click drag the cursor out of the image and currently you'll be able to see the emended background,isn't that simple} to be frank this is too easy however this article was for all the newbies for Photoshop.


And here i go,this is identical image as the previous ones however the one and only difference to note is that of background,the before one was gray and this is of pink,Hope you enjoyed this post if you discover any difficulties at any purpose do pen down your comment and i will be glad to assist you folks.!


Read More

Tuesday, 15 July 2014

HOW TO DISABLE RIGHT-CLICK ON YOUR BLOG


Ah!!Well i was finding for a new post on bizzflies and was running out of idea at some period of time but after spending few of my time i came up with a new post!! Yeah...that's how to disable right-click on your blog!Coming to the point of your blog's niche it depends whether you wanna disable right-click or not,The key reason behind disabling-right click is To Secure your content, Now the generation has come to such a situation that Most of the people are addicted to copy-paste stuffs,So here what hard-work you've done is easily able to do by others in no time,Now looking at the disadvantages there are many of those found yet we need to be safe and secure on web for more reliability.You might notice very big tuts based on small concepts to be covered in most of the posts.In this article we are going to cover-up how-to disable right-click on your blog and secure your images too.
This is a very easy trick which will work for 100% sure.
Proof?? See this

MOVE AHEAD AFTER READING THIS:

The main intention for taking up this decision is mainly to secure your content but this won't be a fair idea under all conditions like-If you own a blog based on "Blogging tricks & Tutorials" and for this you may be guiding your readers to "Copy some particular code and paste at the particular target which you're announcing to them", So when it comes to a place of copying they won't be able to copy because you've disabled right-click and you're readers won't be your readers anymore,but in case if your blog is based on Sharing ideas it is well and good step to apply this type of Security on your blog,here you're readers can read your posts and at the same time your blog is protected.I hope you understand the importance of this.

Move on...
1.Firstly log on to your dashboard>Template>Edit HTML.
2.Find "<body>" tag.You can find any HTML codes,attributes or tags by pressing ctrl+f in your browser.
3.After you find the body tag,you might find yourself with two different cases:
Case A:In a body tag you may have filled up with different things
E.g <body text="black" bgcolor="Orange"> and probability of much more

Case B:You may have it simple
E.g <body>

I wanted to give these examples and cases to state out the exact placement of the code in the tag,If you see the tag just like Case A i would like to tell you to remove all other contents expect "body" and it should get matched-up like the Case B.

4.By this time your body tag  must be just like Case B that is "<body>" only.
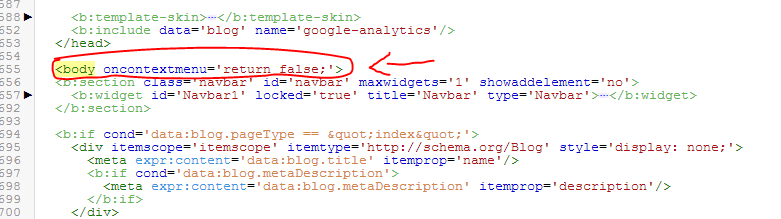
Now copy and paste the following code in the body tag.
oncontextmenu='return false;'
After pasting this code your tag must look something similar to this.


5.At last save your template and have a look at your blog,from now you won't find any more right-click thingy's on your blog.

FINAL VERDICT:

Err....i said that i would even tell how to secure your images rite??!!hmm...Nothing to worry, by this simple code it is true that your images are secured  if you don't believe me do check it out on your own blog itself
Or check out the proof(link) given at the top of the post.
I hope this works out with you too,if you face any problems regarding this please comment and know your solution.
Read More

Sunday, 29 June 2014

HOW TO INCREASE YOUR NUMBER OF LIKES AND COMMENTS IN BUBBLEWS


Well it had been  a few time since i wrote my last post and today i'm back with the knowledge of what I've gained,Let's explore it now. :)

Bubblews??
So what is this bubblews ?This is a website in which you can earn money on per view,like and comment on your account usually said as a blog,And this is one of the cool method to make bags of loads,by this you will be filled with excitement to make your good earnings on bubblews,Sure you need to be happy but before then just have look at these below points to rock safely on bubblews!!!
1.Write unique content with 400+ characters not words.
2.Don't copy and paste the info from any website or around the internet as you will never be paid if you do that so.
3.Don't make self likes for more profit!
4.No traffic exchanges or begging for it
5. Pornographic content never allowed.

You can read : HOW TO MAKE 200$ IN BUBBLEWS PER MONTH for getting more information based on this.

So when you are back here after reading that article continue reading this one,So our main aim is to get huge number of likes and comments per post and which is one of the important part in earning your bucks.!
And for this you need to follow some strategies in order to end up with good results:

1.OWN CONTENT

Here you don't need to have any blogging mind or tricks,here you are allowed to post on various categories such as
a.Anime
b.Art
c.Articles
d.Reviews
e.Tutorials
f.Tech
g.News
h.Health tips
i.Entertainment
and much more..........

So when you have these many wide categories to choose then why need to copy?Bubblews contains a strong algorithm which tracks that from which source you have copied and you will be never paid for that.
If you aim to earn then take time and write good stuffs,and don't worry about the traffic as you will get immediate traffic after posting each article.

2.CONNECT WITH WIDE RANGE OF PEOPLE

In the previous paragraph we discussed on traffic and this is the ultimate way to get traffic that's connecting with people,Connect with lot's of people and   do like their articles so they give you the same response in back!with valuable comments too!!And both(yourself and the connected person) will be each time notified by you and the other one when both give a new post,This can be known as a barter system that is exchange of likes and comments.

3.COMMENT

We are known that we get paid for comments on our posts so if you write well you get positive comments automatically which results in higher money paid....If you could not write a ideal content after trying your best,Go comment on others post and be sure to connect with them,after you go up with this process you will surely get your comments back...So isn't this interesting,but be sure not to copy content from anywhere.

4.IMAGES

As we all frequently think that adding images might drive extra traffic to our posts.....yes this is true but wait! bubblews won't pay you if you insert images from internet ,I would like to prefer you not to upload any images yet if you are willing to do so the only go is taking a screen shot or screen capture.

IT'S YOUR TURN.

Now we came across few basics and strong rules by bubblews ,Take these rules too seriously,and this time it's your chance play safe and get paid.
Post-Name
Reviewed by Reviewer-Name on Jul 24 2014
Rating: 5
Read More

Monday, 23 June 2014

HOW TO CHANGE YOUR SMARTPHONE'S FONT STYLE


Whenever you buy a New smart phone and just have a Look on The Font-Type we notify that it is default usually a simple font like Arial,What if you didn't get well tasted of the font??oh...then just continue reading this article you end up with a new font installed in your Smart-phone within no time.So you need to follow few very simple steps to install a new font on your Phone.This doesn't requires any special skill or coding...to do so but after all just an internet connection to download the app,By the word download you are yourselves able to conclude that is gonna be easy and it's totally true.Why waiting Let's Go ahead.

1.Here i'am going to show two of the screen shot that is (before) and (after) for proof.


This Screenshot is before installing the font app.

2.In the above pic we can see that there is a normal(default) font used and now Let's install the new font.
Go to Google Play Store or (iTunes) And Search for "Scriptfft",This the the app which we need to download
Navigate there and download the app


3.After searching the related keyword you will end up with this result.Now i would highly recommend you to download the first one which is in the image because that is one which works well on all the Smart phones and provides various of Fonts,But one thing to note that is here the types of font that we are going to get are gonna be italic only.

4.So as soon as you download the app just open it,When you open the app you can see loading on progress for this just hit the back button because there's nothing loading over there and there will be no changes made.
After you hit the back button click on "Change your Font",Now it will redirect you to settings and ask you to set your font,Now click on Set font or font style(differs) After you click you get various font styles just select the one you like after its done it asks for "do want to set this as your font" just click ok.

5.After this you need to reboot your Smart-phone in order to install the new font just pass this step and you're done.......Now you have your complete new font ready on your smartphone.


This is the new font style.
In case you are willing to change your font once more just follow these steps and you will get done with it.

I hope you enjoyed this article..stay connected for more new tuts. :)
Read More

Friday, 20 June 2014

HOW TO MAKE FREE CALLS FROM FACEBOOK


We are renowned regarding voice-mail in Facebook and the way to go up with it and currently there's a brand new feature of Free voice calls,It looks pretty smart once we think about free calls,And now The Facebook developers have made it potential.
Free calls from Facebook provides huge advantages like:
1. Unlimited length of speak
2. No deduction of balance
3. call any of your Friend without Phone no required.

So until now we have seen Few advantages of Free calls from Facebook and there'll be in fact few disadvantages,But currently we'll find out how to make free calls from Facebook and later on Discuss few disadvantages.
Let's Start:
1.First of all to have to own Facebook app installed on your android or iOs device.
For this go to "play store" and search for "Facebook" As soon as you go along with showing results download the Facebook app,Or Click on this LINK .
2.As the download Completes Open the app and sign in with your respective Email Id and password.It takes few Time fitting your Profile,After your profile is set up head on along with your profile.
NOTE: Free calls can be created solely who are active at the time of call.
And The Person whom you're tending to make Free call should be active only in Facebook app.
This Screen Capture will assist you resolve the actual Reason.


As you can see that Free call isn't accessible for first Person,whereas it's accessible for 2d Person.
Possible Reasons:
A.The 1st person is inactive or does not use "Facebook app" Or not Active in "Facebook app"
B.The 2d Person is Active,Uses "Facebook app" and active in "Facebook app".

3.So currently you're clear with possible reasons,Hit on free call for whom the call is offered
And currently you have Learnt a way to create Free calls Via Facebook.

DISADVANTAGES:
1.Call connections are poor at several areas.
2.Gets disconnected once web affiliation is down.

Hope you enjoyed Reading this text,Do comment If you discover any problem And Stay tuned for more articles.

RECOMMENDED TO READ: 


Read More

Friday, 13 June 2014

HOW TO DOWNLOAD VIDEOS FROM YOU TUBE ON YOUR SMARTPHONE


Well many a times we will to download and watch our favorite videos because we can watch the videos without any buffering sensation or lag.We usually think of you tube downloader when we are tending to download you tube videos.But how can we get for android??Actually the thing is we won't get the perfect version of you tube downloader for android,if we try searching the app in Google play store we return with these kinds of results.
As these above screen shots gives you readers a perfect idea that what results we get so as these apps wont work out perfectly so the only go is to find a unique app that functions the same as you tube downloader.
So the app which we are going to use is tubex this may less known but amazing workout by the developers.
1.head on to www.tubex.me or click HERE.
2.The screen may now look a bit blank co there are only few screen shots of the app.
3.Now click on download,you will be redirected to new page with two apps as easy tube3.0 and TubeX1.8.0
And now you are given a set of features of both the app but i would highly recommend you to download TubeX as it is easy to handle with.
Now you have successfully downloaded the apk and now it's the time to install we might wonder that why is this not installed automatically??The reason is  that we have just downloaded the apk format from Internet but not from Google play store or iTunes 
4.Now go to the path where you have downloaded the apk and click on it...And it will be installed automatically.But you might find a error message like "This app cannot be installed because it is downloaded from unknown resource" or something like that If you find yourself in such a situation follow the below steps:
Head on to Settings>(Device)Apps>and tick on Unknown sources(Allow applications of Non-market applications).
5.So by this step you will be solved with the common problem faced during the installation.
I hope this work out with you too.
If you face any problems regarding this please do comment below we are here to help you.

FEW ADVANTAGES OF TUBEX
1.Play,download,share any video on the spot.\
2.Download the video at any clarity of your wish.
3.Easy to handle.

DISADVANTAGES
1.Gets hanged many a times.
2.We can download only one video at one time(can download 1video at once.)
  
Read More

Monday, 26 May 2014

HOW TO MAKE A uTORRENT AUTO SHUTDOWN


As we all know that u torrent is one of the best software for downloading anything whether it is a mp 3,mp 4,games,movies etc..that doesn't matter but it performs the best for downloading any type of format.....and we usually won't have the patience for sitting font of the computer when the downloading is taking place,so the best solution we find is to download at overnights,but in case if gets downloaded early and the PC is still on with no work being done...we can say it as a complete dumb work and waste of electricity bills.....So the thing which we want is auto shutdown!!! but do we need to program anything for this perfect output????no way indeed this is a very easy where auto shut down is made simple,this article gives an complete information on how to auto shut down PC after the download completes for newbie torrent users.....

1.When we switch something for download in u torrent we can't wait till the download is complete so if we want to have auto-shutdown follow this simple way........
i)Open u torrent,click on options located on top-left corner


ii)after clicking on options you will be able to see a dropped down menu with various sub-options.
Now go to the last option that is "auto shutdown" and hover on it!!!


2.Now after hovering you will again get more options now just click "shutdown when download completes".
So you are done with it this works perfectly only when the download is in progress if you have any queries based on this just comment below and i will help you solve your problem......
Read More

Friday, 28 March 2014

HIDDEN ANDROID TRICKS

Android has many secrets kept in which is been never noticed by us,there are many useful ways through these shortcuts or long cuts which saves hell of time and learning new codes in andi.
Here are some important codes which works almost on all the android devices
The codes should be typed in the dial pad of your phone

1.*#06# - IMEI number
2.*#0*# - Enter the service menu in newer phones


3.*#*#4636#*#*- Phone info including usage,statistics nd battery
4.*#*#34971539#*#*- detailed camera info
5.*#*#273282*255*663282*#*#*- Immediate backup of all the media files
6.*#*#232339#*#*- WIRELESS LAN TESTS
7.*#*#2664#*#* -Test the touchscreen
8.*#125*0*369# -Software and hardware info
9.*#872564# -USB logging control
10.*#9900# -System dump mode
11.*#301279#- HSDPA/HSUPA control menu
12.*#7465625# -View phone lock status
13.*#*#7780#*#*- Reset the data partition to factory state
14.*2767*3855# -Format device to factory state
Read More
badge